


DNS Query Anonymity: Caching and Encryption
Anyone concerned about online anonymity knows that using a VPN service is a great way to hide your IP address. However, even with a VPN connection, DNS queries are often left unprotected, making it easy to track where your DNS requests are going. This is known as a “DNS leak.” Let’s take a closer look at what DNS is and the issues involved.
What Is DNS and Why Is It Important?
Every computer on the Internet has its own IP address. Without knowing a computer’s IP address, you can’t send it information or requests. An IP address is a four-byte number separated by dots (for example, 162.234.12.110 or 78.31.54.226). For most people, remembering lots of IP addresses is difficult, so the Domain Name System (DNS) was created to make life easier. A DNS server allows you to find the IP address of a website by its domain name.
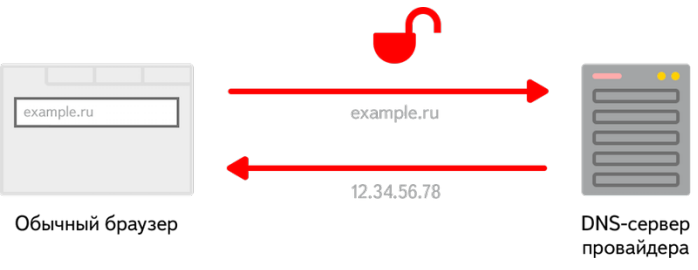
For example, when you enter a website address in your browser, the browser sends a request to the DNS server specified in your network settings. The server responds with the IP address of the site you want to visit. This system is convenient, but it comes with two main problems:
- No encryption of the connection. This means that any attacker can intercept your traffic and substitute the IP address, potentially showing you a fake banking page. It’s also a good idea to hide this traffic from your ISP or law enforcement agencies.
- ISP DNS servers are required by law to keep logs (which IP visited which sites and when) and provide them to authorities upon request. In fact, 99% of DNS servers worldwide keep logs and don’t hide this fact.
How to Protect Your DNS Queries
If you don’t want your data intercepted or your browsing logs read, there’s a reliable solution. Here’s what you need to do:
- Encrypt your connection. Use a program like DNSproxy, which connects to the DNS server through an encrypted DNS resolver. The resolver also communicates with the DNS server over an encrypted connection. With packet sniffers (like Wireshark), only the resolver’s IP address can be seen. Since the packets are encrypted using elliptic curve cryptography, it’s impossible to determine which DNS server you’re actually communicating with.
- Use DNS servers that don’t keep logs. ISP servers are out of the question, and you shouldn’t use Google or Yandex DNS servers for anonymity, as they openly admit to storing information (see their privacy policies). Instead, use servers from OpenNIC Project, which claim not to keep any logs. However, these servers can be unstable. To solve this, use a program like Acrylic DNS Proxy, which allows you to queryQuery is an online Q&A platform where users can ask questions on any topic and get answers from the community. It features voting, reputation points, and topic tags to organize and highlight quality content. While answer quality can vary, Query aims to provide quick, crowdsourced knowledge and create a collaborative space for sharing expertise. With active moderation and community engagement, it has the potential to become a valuable resource for learning and discussion. More up to 10 DNS servers at once and uses the fastest response. This minimizes speed loss and compensates for any server instability.
Step-by-Step Guide to Secure DNS Queries
- Download AcrylicDNSProxy from here and install it. Replace the configuration file in the installation folder with one pre-configured for OpenNIC servers. (A sample config file can be found here.)
- Manually set your DNS address in your network settings. Go to “Network and Sharing Center” → “Local Area Connection” → “Properties” → “Internet Protocol Version 4 (TCP/IPv4).” Set the DNS server to 127.0.0.1 and leave the secondary field blank.
- Start AcrylicDNSProxy via the Start menu by clicking “Start Acrylic Service.” You should see a message confirming a successful launch.
- Test your DNS servers at www.perfect-privacy.com/dns-leaktest. The results should show only the resolver, not your actual DNS servers.
- Add AcrylicController.exe to startup if you want the service to run automatically.
- Encrypt your DNS queries using DNScrypt. Download a ready-to-use build here.
- Unpack and run dnscrypt-winclient.exe. Select your network card and click Install. Now your DNS connections are encrypted.
- Check your setup again at www.perfect-privacy.com/dns-leaktest. None of your DNS servers should be detected. On whoer.net, only the DNS resolver’s address should be visible, with the actual servers remaining “unknown.”
VPN and DNS Encryption
The diagram below (not included) shows a typical connection setup when using VPN servers. There’s a vulnerability: DNS queries can be sent both through the VPN server and directly to the DNS server specified in your network settings.
You might think you can just set your DNS server to 127.0.0.1 to avoid extra requests to your ISP’s DNS. However, if you disconnect from the VPN, your internet won’t work, since VPNs use their own DNS servers. If you simply enter two OpenNIC Project servers, your browsing speed may decrease when the VPN is off. In this case, it’s also recommended to use AcrylicDNSProxy to maintain speed. And if you’re already using AcrylicDNSProxy, why not add DNScrypt as well?
If you use VPN services 100% of the time, you can just set your DNS to 127.0.0.1. That’s enough.
This setup helps anonymize and hide your DNS queries, which can be useful if you ever have to deal with authorities or if a local hacker tries to redirect your DNS requests to inappropriate sites.
Note: If you don’t need all this, simply install AcrylicDNSProxy with your ISP’s, Yandex’s, or Google’s servers for noticeably faster browsing.