


Hacking Amazon Echo and Google Home for Privacy Protection
Security experts are often skeptical about the concepts of the “smart home” and the “Internet of Things.” Manufacturers are eager to collect as much user data as possible, which can lead to leaks. Recently, Amazon accidentally sent 1,700 recordings of one user’s conversations with Alexa to the wrong address. While this is an isolated incident, Amazon stores audio recordings on its servers, just like Google does. Devices like Amazon Echo and Google Home are essentially bugs that users voluntarily install in their homes, agreeing to be listened to. There’s no proof yet that these devices record without the trigger word, but technically, nothing stops them from doing so.
Project Alias aims to change this and give control back to users. Project Alias is a technological equivalent of a parasitic fungus that lives on another organism. But this is a very useful “parasite,” as it acts as a protector for its true owner—the person. Alias blocks the transmission of information to Amazon and Google by jamming the host’s microphones.
The assembly instructions are published on Instructables, and the source code is available on Github.
What You’ll Need
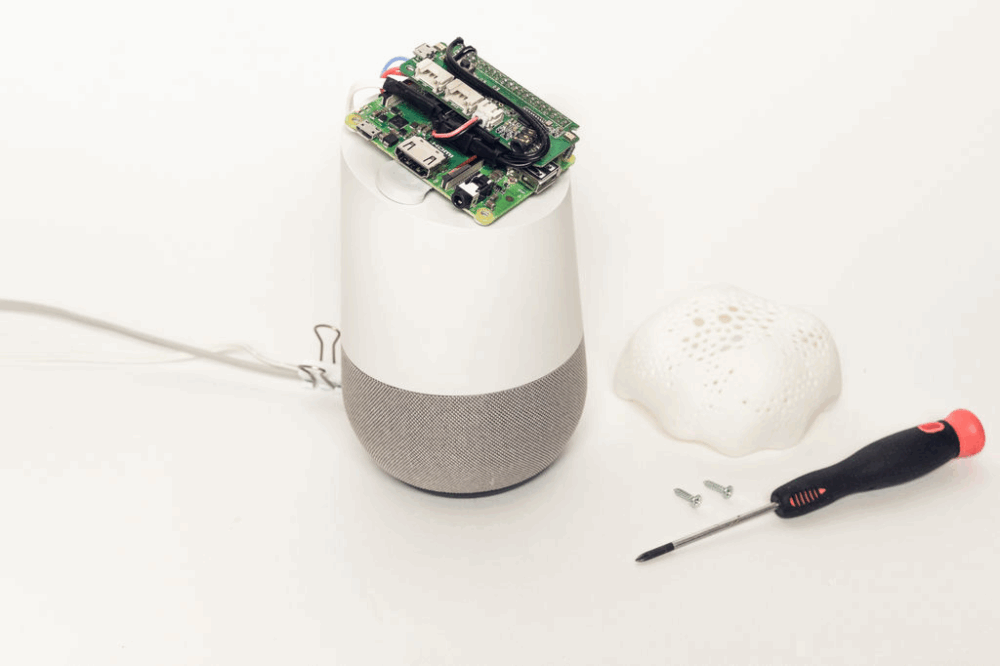
- A single-board computer running Raspbian (Raspberry Pi A+ is sufficient)
- ReSpeaker 2-Mics Pi HAT module with microphones
- Tiny Speaker 16mm
- Micro SD card, audio cable, wires, and four screws
- Access to a 3D printer to print the cover and speaker holder
3D models for the cover for Google Home (stl) and Amazon Echo (stl), as well as the speaker holder (stl), are available online.
Assembly Steps
- Connect the speakers to the ReSpeaker module and supply 5V power to the Raspberry Pi (solder directly to the GPIO).
Software Setup
- Download the latest version of Raspbian to the micro SD card.
- Copy the
sshandwpa_supplicant.conffiles from the project folder, and edit the latter with your WiFi settings. - Install the audio driver for ReSpeaker:
cd && git clone https://github.com/respeaker/seeed-voicecard.git cd seeed-voicecard && sudo ./install.sh - Install Tensorflow and Keras:
sudo apt-get install python3-dev python3-pip git libatlas-base-dev sudo pip3 install tensorflow keras - Install other required modules:
sudo apt-get install python3-numpy python3-spidev python-h5py sudo apt-get install python3-pyaudio libsdl-ttf2.0-0 python3-pygame sudo pip3 install flask flask_socketio python_speech_features - Clone the Alias project:
git clone https://github.com/bjoernkarmann/project_alias.git - Install the boot script and reboot the Raspberry Pi.
Next, you need to train Alias to recognize its name, which can be any sound less than 2 seconds long. The developers say it’s enough to record the name 4–6 times on your phone and press the Train Alias button. You can change the name later if you wish.
That’s it! From now on, the Raspberry Pi will handle speech recognition locally, and your voice assistant will no longer respond to the standard wake word (like “Alexa”) or send any data to Google or Amazon’s cloud.
Who Created Project Alias?
The project was developed by Danish engineers Bjorn Karmann and Tore Knudsen. Manufacturers of such gadgets often see the buyer as just a user of the product, not its true owner. They may try to legally prohibit modifications, claiming intellectual property rights. However, in many countries, once a product is purchased, it becomes the full property of the buyer, who has the right to do whatever they want with it.
Looking at this project, you might wonder: why buy Amazon Echo or Google Home at all if speech recognition can be done on a Raspberry Pi with Tensorflow and Keras? Maybe just to use them as a stand…