


DWC Hydroponics Growing Guide
Hydroponic cultivation offers several advantages. By following a proper feeding schedule, you can achieve better results than with soil growing. While soil is simpler in some ways—using a large pot often means you can get by with minimal fertilization—it’s hard to achieve heavy yields with dense buds without using hydroponic systems. Here’s a step-by-step guide to growing with DWC (Deep Water Culture):
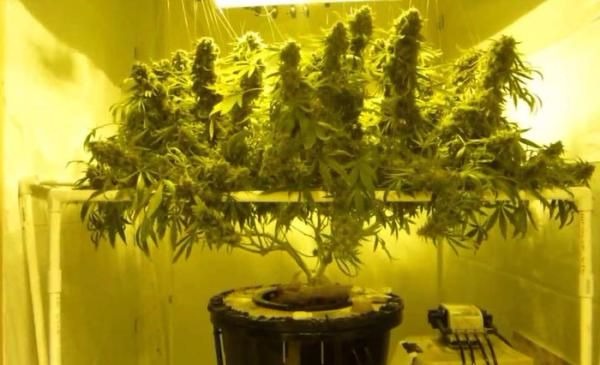
Step 1: Choosing a System
We won’t get into expensive, high-end systems, as they’re not necessary for beginners and often don’t live up to the hype. For your first experience, a standard 14-liter aqua pot is optimal and costs about 1,500–2,000 rubles. There are also duo and quadro aqua pots with more planting sites, but for clarity, it’s best to start with a single-site system.
From personal experience, I’ve used a GHE system with six planting sites and a Spyder drip irrigation system, which cost around 20,000 rubles. Never buy this system! It isn’t lightproof, so the solution quickly becomes contaminated. The included clay pebbles are dirty, and the system’s air pump is underpowered. Even if you fix these issues, there’s another problem: with six plants of different strains in one pot, their roots tangle, making it impossible to harvest one plant without risking root rot for the others. That’s why I recommend a single-site aqua pot, which comes with everything you need—no extra purchases or hassle required.
Step 2: Choosing a Substrate
There are many substrates—mineral wool, coco coir, clay pebbles, etc.—but we’ll use a mix of agroperlite and vermiculite. You can mix them 50/50 or 70/30 in either direction. These substrates don’t need rinsing or treatment, unlike clay pebbles. For seedlings, use a mineral wool plug. Germinate seeds as described in the first article, but instead of soil, place the sprouted seed in the mineral wool plug.
Step 3: Choosing Nutrients
I won’t cover budget nutrients or organic growing here. We’ll use the Hesi hydroponic nutrient line, which has a simple feeding schedule and only requires six different bottles for the entire cycle:
- Hesi Growth: Enough for 2–3 cycles, used only for the first 3 weeks.
- Hesi Bloom: About one bottle per plant per cycle.
- Hesi PK: Used in the second half of flowering; one liter is enough for 5–10 cycles.
- Hesi Super Vit: A little over half a bottle is enough for a cycle; used from start to finish.
- Hesi Power Zyme: One bottle per cycle; used throughout.
- Hesi Root Complex: The most expensive and, in my opinion, not essential. I’ve grown with and without it and saw no difference. It’s used at the start to reduce stress and improve rooting.
Step 4: Water, pH, and TDS Controllers
Tap water or bottled water like “Kalinov Rodnik” works fine. You’ll need a pH test kit and pH up/down solutions. A pH meter costs about 1,500 rubles and lasts a season or two. Since it’s made in China for industrial use, it’s non-repairable and has a non-replaceable electrode. Buy the cheapest pH up/down solutions—they’re all the same inside (alkali and acid). You’ll also need calibration fluid for the pH meter, as they sometimes come uncalibrated, which can cause problems during veg if you don’t notice.
Keep pH at 5.5–5.6 during the initial stage, and 5.8–5.9 after switching to flowering. Adjusting pH daily will yield better results, as plants will absorb more nutrients. Why 5.8? Because phosphorus, which plants love during flowering, is best absorbed at this pH.
I rarely use a TDS meter, but it measures the concentration of particles in the solution. If you follow the feeding schedule, it’s hard to over- or underfeed, but having a TDS meter can still be useful.
Step 5: Changing the Solution
I change the solution once a week. Some people just add more nutrients to increase concentration, but this can cause salt buildup, so I prefer a full change. At the end of the cycle, the plant may drink more, so you might need to change the solution more often. The main rule: first adjust the water’s pH, then add nutrients one by one according to the schedule—never mix them together. Nutrients have a pH buffer, so if you add nutrients first and then adjust pH, you’ll use twice as much pH solution because the nutrients will lock in the pH value.
Step 6: Cleaning the System After the Cycle
This is easy: pour 100 ml of pH down into the pot with 12 liters of water, run the system for a day, and it will clean itself. Then drain, rinse with water, and dry. The system is ready for the next cycle.